WindowsのXAMPPでAmazon S3を操作する
2015年6月2日Amazon S3上にファイルを置いたり、取得したり、削除したりするには「AWS SDK for PHP 2」が必要です。
Windows環境下でのPHP(XAMPP)で、このSDKを利用する方法をまとめました。
なお、本記事では、
C:\xampp\がXAMPPインストールフォルダであることを前提に、説明をしています。
インストールフォルダが異なる場合は、適宜読み替えてください。
PEARのインストール
まずSDKインストールの前準備として、
PEARコマンド使えるようにしましょう。
すでにPEARをインストールされている方は、読み飛ばして”AWS SDK for PHP 2 のインストール”へ進んでください。
①go-pear.batの存在確認
C:\xampp\php\go-pear.bat
というファイルが存在するか確認してください。
②go-pearの実行
***go-pear.bat存在する場合***
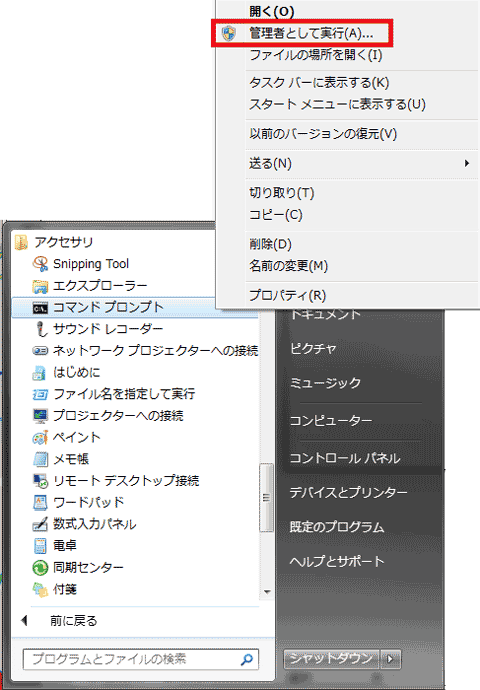
go-pear.batを右クリックし「管理者として実行」してください。
***go-pear.bat存在しない場合***
http://pear.php.net/go-pear.phar
というURLをブラウザで開き、ファイルをC:\xampp\php\に保存してください。
次に、cmd(コマンドプロンプト)を管理者権限で実行し、
以下のコマンドを実行してください。
|
1 2 |
$ cd C:\xampp\php $ php go-pear.phar |
phpコマンドが使えない場合は、こちらの記事の⑤を参考にphp環境変数を追加してください。
③インストールの設定
go-pearを実行すると、インストール上必要となる設定を訊いてきます。
|
1 2 |
Are you installing a system-wide PEAR or a local copy? (system|local) [system] : |
英語で何か訊いてきました(汗)
簡単に訳すと、
ユーザ全員がPEARコマンドを使えるようにインストールするなら、そのままEnterを押下して。
ローカルユーザーのみ使えるようにするなら、”local”って入力して。
みたいなことを言っています。たぶん・・・。
そのままEnterを押しました。
|
1 2 3 4 5 6 7 8 9 10 11 12 13 14 15 16 17 18 19 |
Below is a suggested file layout for your new PEAR installation. To change individual locations, type the number in front of the directory. Type 'all' to change all of them or simply press Enter to accept these locations. 1. Installation base ($prefix) : C:\xampp\php 2. Temporary directory for processing : C:\xampp\php\tmp 3. Temporary directory for downloads : C:\xampp\php\tmp 4. Binaries directory : C:\xampp\php 5. PHP code directory ($php_dir) : C:\xampp\php\pear 6. Documentation directory : C:\xampp\php\docs 7. Data directory : C:\xampp\php\data 8. User-modifiable configuration files directory : C:\xampp\php\cfg 9. Public Web Files directory : C:\xampp\php\www 10. Tests directory : C:\xampp\php\tests 11. Name of configuration file : C:\Windows\pear.ini 12. Path to CLI php.exe : c:\xampp\php 1-12, 'all' or Enter to continue: |
また英語で何か訊いてきました(汗)
簡単に訳すと、
こんな感じでインストールしようと思うけど、1~12の中で変更するところある?
全部変更するなら「all」って打って。
一部を変更するなら、変更する項目の番号を打って。
何も変更しないならEnter押して。
みたいなことを言っています。
C:\Windows\に書き込むのはやめてほしいので、「11」を指定し、
C:\xampp\php\配下にpear.iniを作成するよう変更します。
|
1 2 |
1-12, 'all' or Enter to continue: 11 Name of configuration file [C:\Windows\pear.ini] : $prefix\pear.ini |
再度、確認画面が出てきます。
|
1 2 3 4 5 6 7 8 9 10 11 12 13 14 15 16 17 18 19 |
Below is a suggested file layout for your new PEAR installation. To change individual locations, type the number in front of the directory. Type 'all' to change all of them or simply press Enter to accept these locations. 1. Installation base ($prefix) : C:\xampp\php 2. Temporary directory for processing : C:\xampp\php\tmp 3. Temporary directory for downloads : C:\xampp\php\tmp 4. Binaries directory : C:\xampp\php 5. PHP code directory ($php_dir) : C:\xampp\php\pear 6. Documentation directory : C:\xampp\php\docs 7. Data directory : C:\xampp\php\data 8. User-modifiable configuration files directory : C:\xampp\php\cfg 9. Public Web Files directory : C:\xampp\php\www 10. Tests directory : C:\xampp\php\tests 11. Name of configuration file : C:\xampp\php\pear.ini 12. Path to CLI php.exe : c:\xampp\php 1-12, 'all' or Enter to continue: |
「11」が設定した通りに変わっているのを確認したら、Enterキーを押してください。
|
1 2 3 4 5 6 7 8 9 |
****************************************************************************** WARNING! The include_path defined in the currently used php.ini does not contain the PEAR PHP directory you just specified: <C:\xampp\php\pear> If the specified directory is also not in the include_path used by your scripts, you will have problems getting any PEAR packages working. Would you like to alter php.ini <C:\xampp\php\php.ini>? [Y/n] : |
“php.ini” の設定を更新するってことで良いですか?
みたいなことを言っています。
もちろんYで。
|
1 |
Would you like to alter php.ini <C:\xampp\php\php.ini>? [Y/n] : Y |
④環境変数の追加
インストールが成功すると、最終画面に下記のようなメッセージが出てきます。
|
1 2 3 4 5 |
* WINDOWS ENVIRONMENT VARIABLES * For convenience, a REG file is available under C:\xampp\php\PEAR_ENV.reg . This file creates ENV variables for the current user. Double-click this file to add it to the current user registry. |
C:\xampp\php\PEAR_ENV.regを実行すれば、
PEAR系環境変数を追加できるよ。
と教えてくれてますので、遠慮なく実行してください。
ユーザーの環境変数に
PHP_PEAR_SYSCONF_DIR
PHP_PEAR_INSTALL_DIR
PHP_PEAR_DOC_DIR
PHP_PEAR_BIN_DIR
PHP_PEAR_DATA_DIR
PHP_PEAR_PHP_BIN
PHP_PEAR_TEST_DIR
が追加されます。
AWS SDK for PHP 2 のインストール
①SDKのインストールに必要なPEARのチャンネルを追加
cmd(コマンドプロンプト)を管理者権限で実行し、
以下のコマンドを実行
|
1 2 3 |
$ pear channel-discover pear.amazonwebservices.com $ pear channel-discover guzzlephp.org/pear $ pear channel-discover pear.symfony.com |
②SDKのインストール
|
1 |
$ pear install aws/sdk |
インストールに成功すると、
C:\xampp\php\pear\AWSSDKforPHP
があるはずです。
おわりに
実際にS3を操作するには、バケットの作成や権限系の設定など、これ以外の様々な準備が必要です。
SDKでのS3操作に関して言えば、それほど複雑ではありませんので、
アプリサーバーとメディアファイルサーバーを分けて、アクセスを分散させたいなどの目的があるなら、S3は取り入れたほうが良いと思います。


